There are only a couple suppliers of these parts in the USA, and I'm not too sure if the other suppliers have better products but I would advise everyone else to look into the very fine details. They might all be the same, but at this point I am having to do a lot of metal working which seems to be excessive.
OK boys and girls, for the test question, why did I split the hood on both sides at the curve (added 1/4" in these splits) rather than one cut in the center at the top, and just add 1/2"? Some answers were spot on. The welding of a flat panel, such as the top of the hood, will result in some distortion of the metal which is almost impossible to eliminate. By splitting on the curve this distortion is somewhat controlled, but more importantly the final body work is much easier to complete on a curve.
 |
| In this picture you can see the 2"wide strip of 1/8" metal that is curved around the top of the cowl. This will be welded top the underside of the hood for added strength and stability. |
 |
| Here is another picture from the drivers side showing the reinforcing strip. |
 |
| Another picture from above. |
 |
| After removing the hood and turning it upside down, I was able to place the reinforcing strip in position for tack welding. |
 |
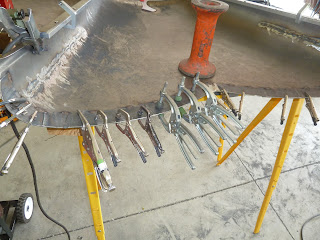
| With some added clamps the final stich welding can take place. Since this reinforcing strip is 1/8" thick there shouldn't be any distortion of the hood, if clamped. |
 |
| Back to this belt line thing......and after the reinforcing strip has been added. Ed R, Tom S and Gary D came over to see the progress so far. Gary D. happens to have built many top quality show cars over the years and currently owns about 15. Therefore he knows what he talks about and within seconds he's zeros in on the belt line. You know, by now I'm feeling rather good that the top lines are straight as an arrow. He then drops the bomb and asks how I'm going to align the bottom of this stupid thing. He didn't call it a stupid thing but that's the nicest thing I'm calling it by now. |
 |
| Hood belt line about 1" |
 |
| Body belt line about 1.25" Seems to be needing about 1/4" in there somewhere. |
 |
| I split the belt line going forward about 15" with a plasma cutter and then add the necessary 1/4". Now the top and bottom lines are in alignment. |
 |
| Since the back of the hood is now completed I will need to make the spacing around the front correct. This is a one piece hood, which is not standard for 1933 cars. They had a two piece hood with a hinge down the center. The front of the hinge would end where the tail of the greyhound is. You could open either side of these hoods, or both, to work on the engines of these cars. With the hinge running down the center, the hood panels would not interfere, while opening, with the optional greyhound. I like the greyhound but chose to go with a one piece hood that opens from either side, for ease of installation, believe it or not.. But herein lies a problem. I'm told that you can't have both, a hound and a one piece hood because the hood will hit the dog when tilting the hood into the open position. Why can't I remove the dog just prior to opening the hood and also at night when traveling and parked at a hotel? Yep, it can be done. |
 |
| I made a quarter turn reciever for the dog and the standard cap, which is shown here. I can quarter turn the dog, remove it, and replace it with this cap at any time. I'll have to take a few more pictures to show how this works. |
 |
| This picture shows another use for a black Houghton golf towel, as an engine cover. It also shows the radiator cap after the hood has been opened. |


