Friday, January 25, 2013

1/25/2013

Time to start


Time to drive


I must be crazy having this guy do my body work. Gary D tried to find a bigger hammer to do some body work but couldn't..................actually, he did use this hammer to slightly adjust one door. It worked out OK. I'm told he know's what he's doing.


Here, you can see how a sound deadner has been added to the interior panels. Eventually it will be added to all of the interior panels.

Also, the seams are all being sealed with OEM seam sealer.


In this picture, you can see how I leveled the trunk seams.

Another picture where I added a lighter filler (it's the light blue stuff).


Same goes here.


Tuesday, January 1, 2013

1/1/2013 Happy New Year

The past month has been devoted to wiring and other under dash tasks, in order to make sure all of the ancillary items are connected and operating. This is all necessary because the ECM will be checking into items like the air conditioning to determine if the engine fan should be turned on. If the ECM sees that the A/C is off then the engine fan will be controlled by the engine coolant temp as it's primary input. Therefore, the coolant wiring and the A/C, both, need to be operating correctly. Other inputs can include oil level, fuel pressure, door locks, security and the list goes over 100 items, although I had the  manufactures of my engine wiring harness eliminate a bundle of these inputs.


This photo shows the body wiring harness.


The engine wiring harness is almost completely hidden in the photo. The only engine wiring that can be seen is the coil of orange wires sitting on top of the transmission. This coil has the OBD plug that will be connected to a laptop for the final tuning. 

The ECM can be seen just above the gas pedal.

 Eventually, all of the wiring will be tucked out of sight.


With the ECM completed its' time to attempt an engine start and run.

I tried to download the run video but no such luck. I think the video may larger than wht this website will allow. Bottomline is that it started and ran as planned. I shifted it into gear and drove around the neighborhood. It didn't seem to be shifting so I temporarily connected a tach and Todd and I drove down our road. At approximately 20mph the tach was reading 2000rpm. Next I dug out the specs for my gear ratio, tire size and various transmission ratios and found that I was starting in second gear and it remained in  second gear.


I trailered the 33 out to a local Chevy dealership to have the Transmission Control Module (TCM) checked and possibly set. What I thought would be easy to upload, turned out to be rather difficult, due to required VIN numbers by GM. Jay E was very tenacious and this is what really paid off in the end. He was able to load the TCM with the programing from a GMC Yukon and this enabled the transmission to shift out of second gear which I found out was the the limp setting. Limp, as in being able to limp home if something drastic has happened to your trans.

Jay E attempted to load the programming from a 2013 Camero, with a LS3 and an 6 speed automatic. The guys at GM told him that in addition to the TCM and ECM this car also has a BCM (body control module) and all three are communicating with each other as the car moves. Take for example, if one of these modules detects one of the rear wheels turning too fast for the engine settings or whatever, than it makes adjustments to the ECM or TCM. They all have to be coordinated. Therefore, inorder to load programming to my 33 it was necessary to go to a GMC Yukon. Ok for now but this will have to change via my OBD.


The TCM is loading with standard GM programming which is not what I'm looking to keep. My next step is to eventually have an after market (HP Tuning) programming applied to the TCM.


Saturday, December 15, 2012

12/14/2012 Wiring and Starting

I really like this new phase (wiring), although there is still some work that I have to do on the hood, I'm just putting it off for now while my focus has changed to the wiring so I can start the engine. I've owned this engine far too long for it not to be running. The justification is that the internals need oiling to keep from rusting. How's that.


This is an older photo showing the throttle body prior to being installed on the intake.


Here is another older photo that shows throttle body as it is intended to be installed on the engine by General Motors. Then, attached to the front of the throttle body will be the mass air flow sensor and then and some type of air filter or air fliter ducting. My problem, in the 33 Ford, along with a ton of other hot rods, there isn't enough room between the intake manifold and the radiator for all of these parts. Therefore alterations are in order.
 

In this photo, thanks to my mentor Jurgen B. for this great design and Brian G for the welding, I've been able to fabricate a 4" diameter tube that wraps back on top of the intake where I've now attached the throttle body. One thing I do have is a lot of room on top of the engine.

In this photo I've also attached the mass air flow sensor.
This photo really shows the electronic throttle body attached between the fabricated tube and the mass air sensor. I've also attached the electronic wiring to to the throttle body. This wiring has replaced the old mechanical (rod or cable) throttle linkage typically seen on carbureted engines.

Here is what I'll use as an air cleaner for the time being, but eventually I probably will make something very different.


All of this will be placed under the dash, hopefully in some order.

This is the engine harness and computer portion of the previously seen wiring


This picture shows the canon plug on the back of the transmission. As with the engine, the 6L80E transmission is electronically controlled. The computer or ECM (electronic control module) also called ECU (electronic control unit) among other terms for this device, are inside the body of the transmission. Adjustments are made to the transmission and engine by attaching a laptop computer to the data port under the dash of the car.


Another picture of the transmission cannon plug.


Here is the engine ECM installed under the dash. Right in the center of the picture you can see (oval looking thing) where the plug attaches to the gas pedal. Once again completely electronically controlled.  


Back to a little fab work. I've installed the third brake light in the tonneau cover. 


Attaching the engine wiring is as simple as plugging a plug into a socket. Here you can see the socket (white) and the plug (purple and blue) for one of the two water temp probes. In addition to Current Performance labeling every plug, GM has made every plug and socket to a different configuration. I have to admit, there is absolutely no way to wire incorrectly, using the harness supplied by Current Performance.


Here the plug is inserted half way into the socket.


Completely installed. Now, plug in the remaining 29 plugsi into their sockets and the engine should turn over. Right?

I installed the coolant overflow tank to the back side of the radiator. That's the long 2" cylinder. The reason I'm showing this is that it turned out to be a real big event. I originally thought I would be able to drill the holes for the attaching hardware after the radiator was installed but wrongo wrongo. It was impossible to get a right angle drill into position therefore out came the radiator, after removing the grill. Drilling the holes in the fan shroud then reinstalling the radiator and grill.


After all the work installing the overflow tank I thought it warranted at least two pictures.


Eventually all of the engine wiring was in place and it was time to test the engine. This is a milestone for car builders.It definitely was for me. Although wasn't time to actually start the engine, as I wanted to turn it over a few times to get he oil moving around inside the engine.

Thursday, November 22, 2012

11/15/12 Installing Body


The plan is to install the body on the frame for the final time. This will be truly a momentous occasion.

I will also install the fenders, running boards, gas tank cover, grill and hood for one final fit. These will eventually be removed by the body man for final body work and paint but the body will be there to stay.


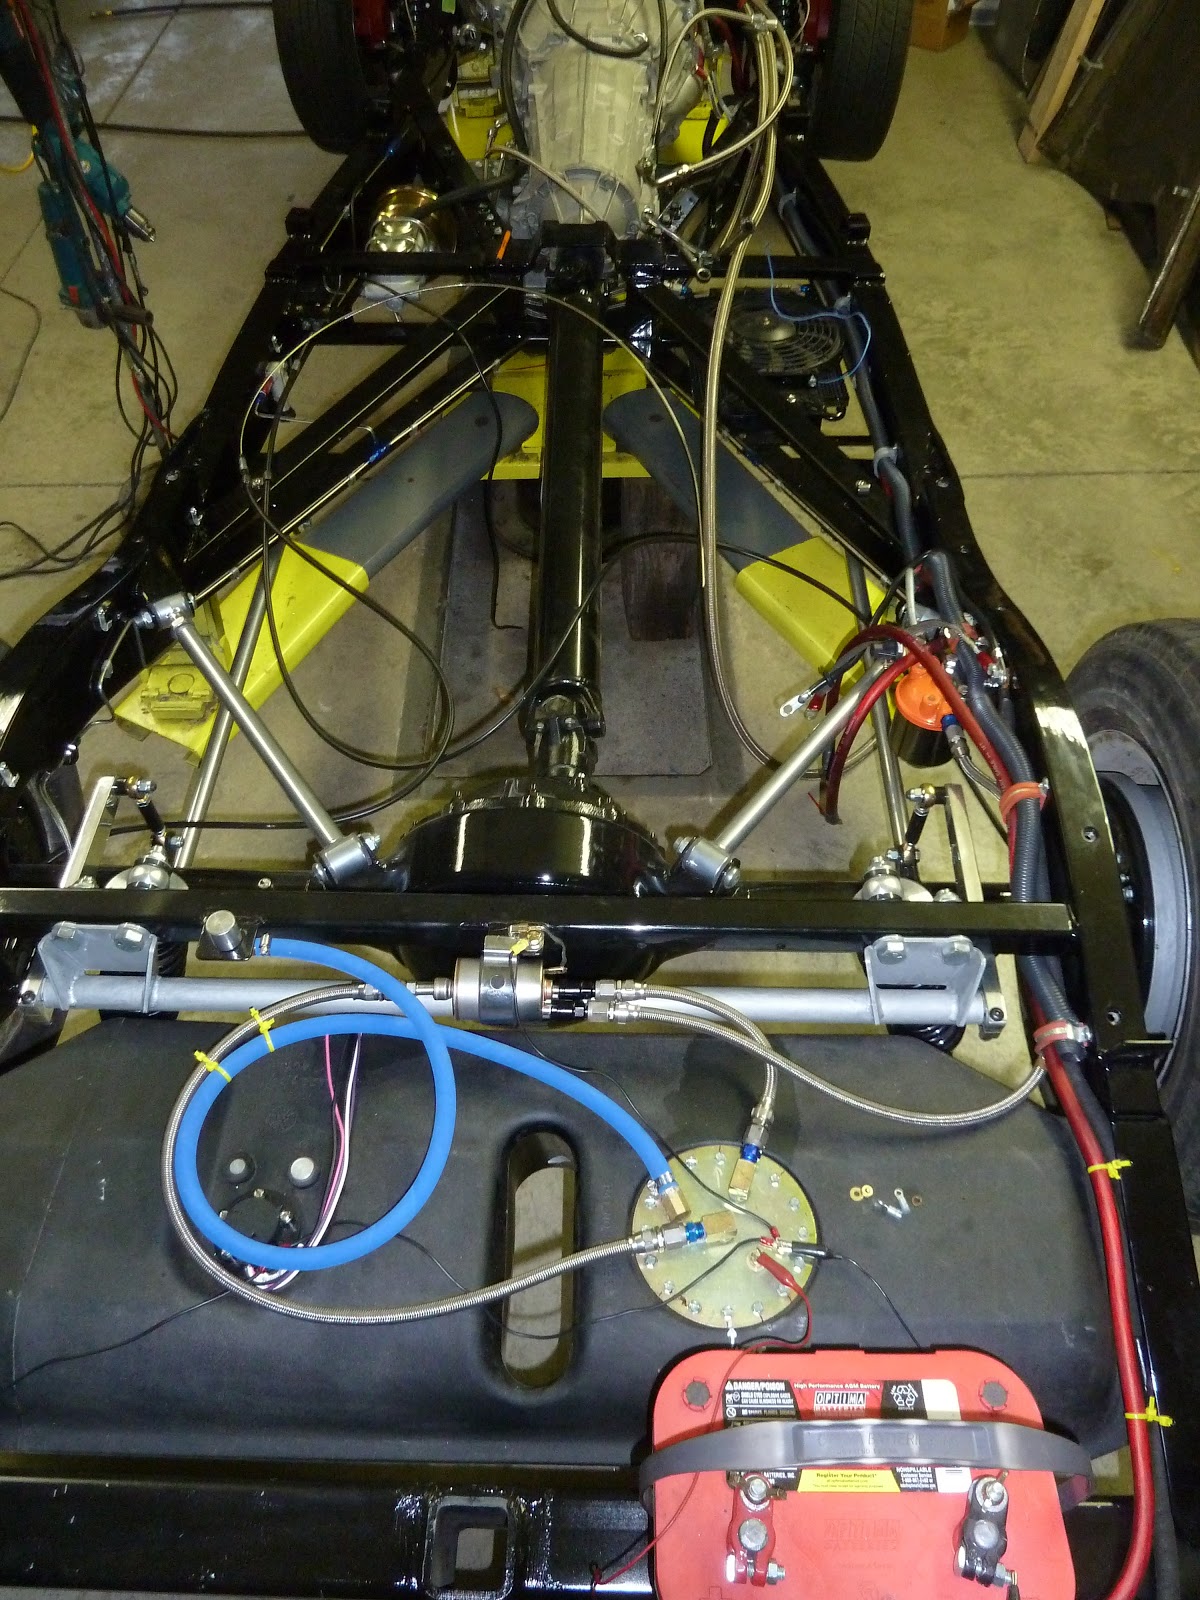
Here is a picture of the frame with all of the components installed. The battery in this picture is not installed in it's final place but I needed a power source for the in-tank fuel pump to pressure test the fuel system.

As can be seen, the emergency brake cables are not in their final position because they will be attached to the bottom of the body as will some additional large red battery cables, which are not in this picture.


Here, I've repositioned the gantry crane holding the body over the frame. The trick now is to lower the body in the exact position it was when I fitted the fenders, running boards and hood the last time. Since the fenders, running boards and hood are attached to the frame and not the body it is imperative that the body be placed in the exact same position on the frame as when last removed. If this is not done, the gap between the body and the inner fender panels will not be correct. You can think of it this way: the fenders hood, running boards are bolted solid to the frame. The body will have a very slight amount of  movement, forward, up and down due to it's rubber mounting. Although there isn't much movement there is enough to change the fit, if not careful. To help control the front to rear movement of the body on the rubber mounting pads, I welded a 1/2" jack screw on each side of the car between the body and the frame. This will allow a slight adjustment of the body, front to rear, after the car has been driven a few miles.

Something I did prior to removing the body the last time, which I'm not too sure I mentioned, was to imprint tic marks or permanent alignment marks with a chisel on the body and frame.


The engine intake manifold is to the left (black and grey) and the firewall is to the right (all black). I knew this vacuum fitting (black rubber hose in the center of the picture touching the firewall) for the power brake booster was going to be very close when I originally positioned the engine and body, but this is way  close.
We had a group of friends over on 11/6 for a victory party and I wasn't going to say anything about this fit. Well, Gary F saw this and said "this has to be changed". I knew right then, with his experience and knowledge, I had to do something. What a bummer, no, not changing the rubber hose, the victory party. Who would have imagined we are going to have another four years of such BS.


Well anyway, the next day I removed the intake manifold, drilled and tapped a hole, as can be seen where the white fitting has been installed and I eventually capped the black hole in the center.


Here the manifold has been reinstalled with the boost hose repositioned and the center hole capped.
By the way, the black duct tape in the center of the picture is to cover the open oil pressure hole. This drops directly into the engine therefore I really don't want anything going in there by mistake.


With the fenders and running boards installed the gaps are turning out as planned. I'm sure glad I made those tic marks.


I had to wait to put the passenger front fender on because it makes it much easier to install the heater and air conditioning hoses with it off. I was able to install the radiator and radiator hoses.

Here, I decided to test the A/C hoses with a vacuum pump, thanks to Ron H. If there are any leaks, now is the time to remedy the problem.


When I had AutoRad make my radiator I asked them to install a port on the top tank for testing. this is where the pressure gague is installed, along with a valve where I pumped in air. I also asked them install two ports on the bottom tank. One for a drain and one for a sacrificial zinc anode similar to the ones used on boats running in salt water. Flex-alite, here in Tacoma, recommend these anodes with all aluminum radiators and aluminum engine blocks. What is interesting about Flex-Alite is that they are really down on the use of Dex Cool (red) coolant. Yet Vette Works in Auburn uses Dex Cool entirely. They said that if there were any problems with it GM would not be using the red stuff, exclusively.

I was able to connect a gauge to the upper port to read the coolant system pressure during my test. The radiator cap is a 16lbs safety valve during my test, therefore I wasn't worried about actual accuracy of the gauge. I'm mainly interested in a leak down test of the system. 


This is an older picture but you can really see where the bulkhead fittings go through the lower firewall. They are the four aluminum fittings just above the 3" factory installed hole with the lifting hook. I left the 3" hole for my wiring harness to pass into the engine bay.


This is one of the main reasons I wanted to do a pressure test of the A/C and the coolant systems. These four lines are bulkhead fitting going from the engine bay into the car. They are going to be rather difficult to reach after the fender has been installed. The engine is the shiny aluminum thing to the right and the black is part of the firewall looking back on the passenger side of the car.  


Here is the inside of the car where the bulkhead fitting come through the lower firewall on the passengers side of the car. Once again, you can see how difficult it is to reach these fittings. I was able to install them starting at the top fitting and then moving down to the next one. To repair the top fitting will require the removal of the bottom three. Not the best application, but I found it necessary if you don't want any holes in the firewall.

This is a better picture of the four fittings. These are the same fitting as in the last picture but now you can see where I've routed the hoses. Two are for the heater and two are for the A/C.


I added the final battery cables and positioned the E brake cables to the bottom of the body, although they are difficult to see since they are black. Locating the place for the E brake handle, allowing room for the cables, building the cable attach points and making sure the cables don't get too close to anything that moves, like the drive line or rear sway bar and keeping away from too much heat such as the exhaust or mufflers really doesn' t leave you many options.


This is under the dash on the drivers side showing the installation of the wiper motor. There is a cable that runs inside the curved 1/2" aluminum tubing coming from the wiper motor. It goes into the black rectangle or transmission at the top of the picture and then continues over to a similar rectangle on the passenger side of the car.


Now you are able to see both of the wiper transmissions


HAPPY THANKSGIVING

Sunday, October 28, 2012

10/28/12 Phase II continues

This is the second time I've tried to post to this blog, today. I can assure you that my car building knowledge has to be better than my computer knowledge.

If you opened this blog prior to 1:00 pm you were able to see my post from early this morning, if you are opening after 1:00 you will be seeing only this post, since the first one was deleted. Musta been a gremlin.
I've made some progress in the past few days although hunting season has competed for some of my time.


This picture is one of the areas for deer hunting although the moose have invaded and there are very few deer.

A picture of our deer camp with the three tents and outdoor living area.


Mike L has great Internet service. Wow, only in America

Dinner is about to be served


Comfortable seating along with stainless steel wine goblet


We do allow some non hunters but they have to be experienced in splitting wood with an ax.


As I mentioned in my last post I still had to add the vent hose to the fuel system. This is the blue hose in this picture. The only part that still needs to be completed is the addition of fuel.

The red cable on the right side is connected to a charging lug which will be beneath the rear bumper. This will be used for charging the battery during the winter and for jump starting other peoples cars.


 Since the engine has been installed on the frame it is a lot more convenient to paint the firewall prior to installing  the body on the frame.


This picture shows the firewall prior to any paint. Take note of the two 3" welds on each side of the firewall.


The firewall has now been painted and clear coat added. Only problem is the waves in the clear coat. This can really be seen when looking at the reflection of the roof line of the house.


Here is the next picture after the painted firewall has been sanded with 2000 grit paper. Now look where the 3" welds were.

At this point half of the firewall has been buffed with a wool wheel and rubbing compound.


Rubbing compound complete, polishing and wax still to go.


Most of the waves have been removed but it looks like I may need to sand one more time and proceed with the rubbing and polishing compounds again. Not too bad for a firewall and this can be considered practice for the final body paint and polishing.


Here is that same square from the last post, although more parts have now been added. Any ideas what it is? It will be necessary to think out of the box to come up with the correct answer.

I not too sure about you but I'm ready for this political season to end.